React에서 Firestore를 사용하여 DB 제어하기
Firebase의 Firestore는 유연하고 확장 가능한 NoSQL 기반의 데이터베이스이며, Collection, Document, Field로 구성되어 있고, 프론트엔드 코드만을 사용하여 빠르게 백엔드를 기능을 구현할 수 있습니다.
하지만 직접 백엔드를 구현하는 것에 비해 요금이 비싸고, 쿼리도 빈약하며, 기능의 커스텀에 제약이 많습니다.
1. firebase 설치 및 config 설정
firebase console에서 데이터베이스를 생성해줍니다.
npm으로 firebase를 설치해줍니다.
npm install firebase
Firebase Console -> Project settings -> General 에서 config 정보를 가져옵니다. (디렉토리 경로와 파일 이름은 바뀌어도 상관 없음)
초기화를 해주고, Firestore와 Storage를 사용하기 위해 하단에 db, storage를 export하는 코드를 추가합니다.
import { initializeApp } from 'firebase/app';
import { getFirestore } from 'firebase/firestore';
import { getStorage } from 'firebase/storage';

const firebaseConfig = {
  apiKey: '',
  authDomain: '',
  projectId: '',
  storageBucket: '',
  messagingSenderId: '',
  appId: '',
  measurementId: '',
};

const app = initializeApp(firebaseConfig);
export const db = getFirestore(app);
export const storage = getStorage(app);
이제 사용할 파일에서 불러와 사용하면 됩니다.
Firestore 메서드는 Promise 객체를 리턴하기 때문에, .then()을 사용하거나 async, await를 사용하면 되며, 이 글에서는 후자로 통일하고, 예외처리 코드는 생략하겠습니다.
2. ID를 지정하여 field 추가하기
setDoc을 사용하여 document의 ID를 지정하여 field를 추가할 수 있습니다.
doc(db, 컬렉션, 도큐먼트), {필드} 형식으로 실행하면 해당 collection에 지정한 Document ID 값으로 Field가 저장됩니다.
import { useEffect } from 'react';
import { db } from './firebase-config';
import { doc, setDoc } from 'firebase/firestore';

function App() {
  const test = async () => {
    await setDoc(doc(db, 'notice', 'first'), {
      title: `제목`,
      content: `내용`,
    });
  };

  useEffect(() => {
    test();
  }, []);

  return <></>;
}

export default App;
위 코드를 실행하고 데이터베이스에 올라간 결과입니다.

3. ID를 자동으로 생성하여 document 추가하기
setDoc 대신에 addDoc를 사용하면 db에서 document ID가 자동으로 생성됩니다.
import { useEffect } from 'react';
import { db } from './firebase-config';
import { collection, addDoc } from 'firebase/firestore';

function App() {
  const test = async () => {
    await addDoc(collection(db, 'notice'), {
      title: `제목`,
      content: `내용`,
    });
  };

  useEffect(() => {
    test();
  }, []);

  return <></>;
}

export default App;
실행 결과, 자동으로 document ID가 생성된 것을 볼 수 있습니다.

4. document 업데이트
updateDoc을 사용하여 document를 업데이트 할 수 있습니다.
import { useEffect } from 'react';
import { db } from './firebase-config';
import { doc, updateDoc } from 'firebase/firestore';

function App() {
  const test = async () => {
    await updateDoc(doc(db, 'notice', 'first'), {
      title: `제목_수정`,
      content: `내용_수정`,
    });
  };

  useEffect(() => {
    test();
  }, []);

  return <></>;
}

export default App;
필드의 내용이 수정된 것을 볼 수 있습니다.

5. 1개의 document 가져오기
getDoc을 사용해서 1개의 document를 가져올 수 있습니다.
import { useEffect } from 'react';
import { db } from './firebase-config';
import { doc, getDoc } from 'firebase/firestore';

function App() {
  const test = async () => {
    const docRef = doc(db, 'notice', 'first');
    const docSnap = await getDoc(docRef);
    console.log(docSnap.data());
  };

  useEffect(() => {
    test();
  }, []);

  return <></>;
}

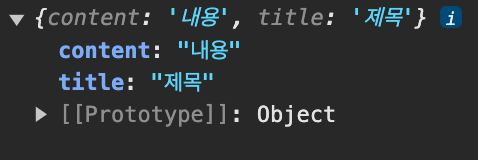
export default App;
실행 결과

6. document 삭제하기
deleteDoc을 사용하여 document를 삭제할 수 있습니다.
import { useEffect } from 'react';
import { db } from './firebase-config';
import { doc, deleteDoc } from 'firebase/firestore';

function App() {
  const test = async () => {
    await deleteDoc(doc(db, 'notice', 'first'));
  };

  useEffect(() => {
    test();
  }, []);

  return <></>;
}

export default App;
7. 여러 document 가져오기
getDocs를 사용해서 collection의 모든 document를 불러올 수 있습니다.
아래 예시에서 querySnapshot.docs.map 대신 querySnapshot.forEach를 사용하여도 됩니다.
import { useEffect } from 'react';
import { db } from './firebase-config';
import { collection, getDocs } from 'firebase/firestore';

function App() {
  const test = async () => {
    const querySnapshot = await getDocs(collection(db, 'notice'));
    const docs = querySnapshot.docs.map((doc) => {
      return doc.data();
    });
    console.log(docs);
  };

  useEffect(() => {
    test();
  }, []);

  return <></>;
}

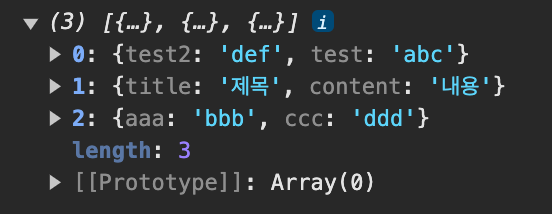
export default App;
실행 결과

8. 쿼리, 정렬, 제한으로 document 가져오기
쿼리, 정렬, 제한 등으로 조건에 맞는 collection의 document를 가져올 수 있습니다.
복합 쿼리를 사용할 경우 사전에 콘솔에서 색인 생성이 필요하며, orderBy의 경우 해당 필드가 존재하지 않으면 document를 반환하지 않습니다.
import { useEffect } from 'react';
import { db } from './firebase-config';
import {
  collection,
  query,
  where,
  getDocs,
  orderBy,
  limit,
} from 'firebase/firestore';

function App() {
  const test = async () => {
    const noticeRef = collection(db, 'notice');

    const q1 = query(
      noticeRef,
      where('content', '!=', '내용'),
      orderBy('name', 'desc'),
      limit(5)
    ); // content 필드가 '내용'이 아닌 모든 document를 name 필드 기준으로 5개의 document를 내림차순으로 반환

    const q2 = query(
      noticeRef,
      where('title', 'not-in', ['안녕', 'Hi']),
      orderBy('date')
    ); // title 필드가 '안녕' and 'Hi' and 'null'이 아닌 모든 document를 오름차순으로 반환

    const querySnapshot = await getDocs(q1);
    querySnapshot.forEach((doc) => {
      console.log(doc.data());
    });
  };

  useEffect(() => {
    test();
  }, []);

  return <></>;
}

export default App;
9. sub-collection의 document 가져오기
document 하위에 다시 collection을 생성할 수 있습니다.
아래 코드는 posts collection -> first document -> comment collection의 모든 document를 가져옵니다.
import { useEffect } from 'react';
import { db } from './firebase-config';
import { collection, getDocs } from 'firebase/firestore';

function App() {
  const createSubCollection = async () => {
    const querySnapshot = await getDocs(
      collection(db, 'posts', 'first', 'comment')
    );
    const docs = querySnapshot.docs.map((doc) => {
      return doc.data();
    });
    console.log(docs);
  };
  useEffect(() => {
    createSubCollection();
  }, []);

  return <></>;
}

export default App;
10. sub-collection 삭제하기
document가 삭제되더라도 하위 collection은 자동으로 삭제되지 않습니다.
모든 document를 불러온 뒤, 반복문을 돌려서 하위 컬렉션의 모든 문서를 삭제해야 합니다.
import { useEffect } from 'react';
import { db } from './firebase-config';
import { collection, getDocs } from 'firebase/firestore';

function App() {
  const deleteSubCollection = async () => {
    const comments = await getDocs(
      collection(db, 'posts', 'documentID', 'comments')
    );
    comments.forEach(async (comment) => {
      await deleteDoc(doc(db, 'posts', 'documentID', 'comments', comment.id));
    });
  };
  useEffect(() => {
    deleteSubCollection();
  }, []);

  return <></>;
}

export default App;
11. 실시간 Document 리스너 구현하기
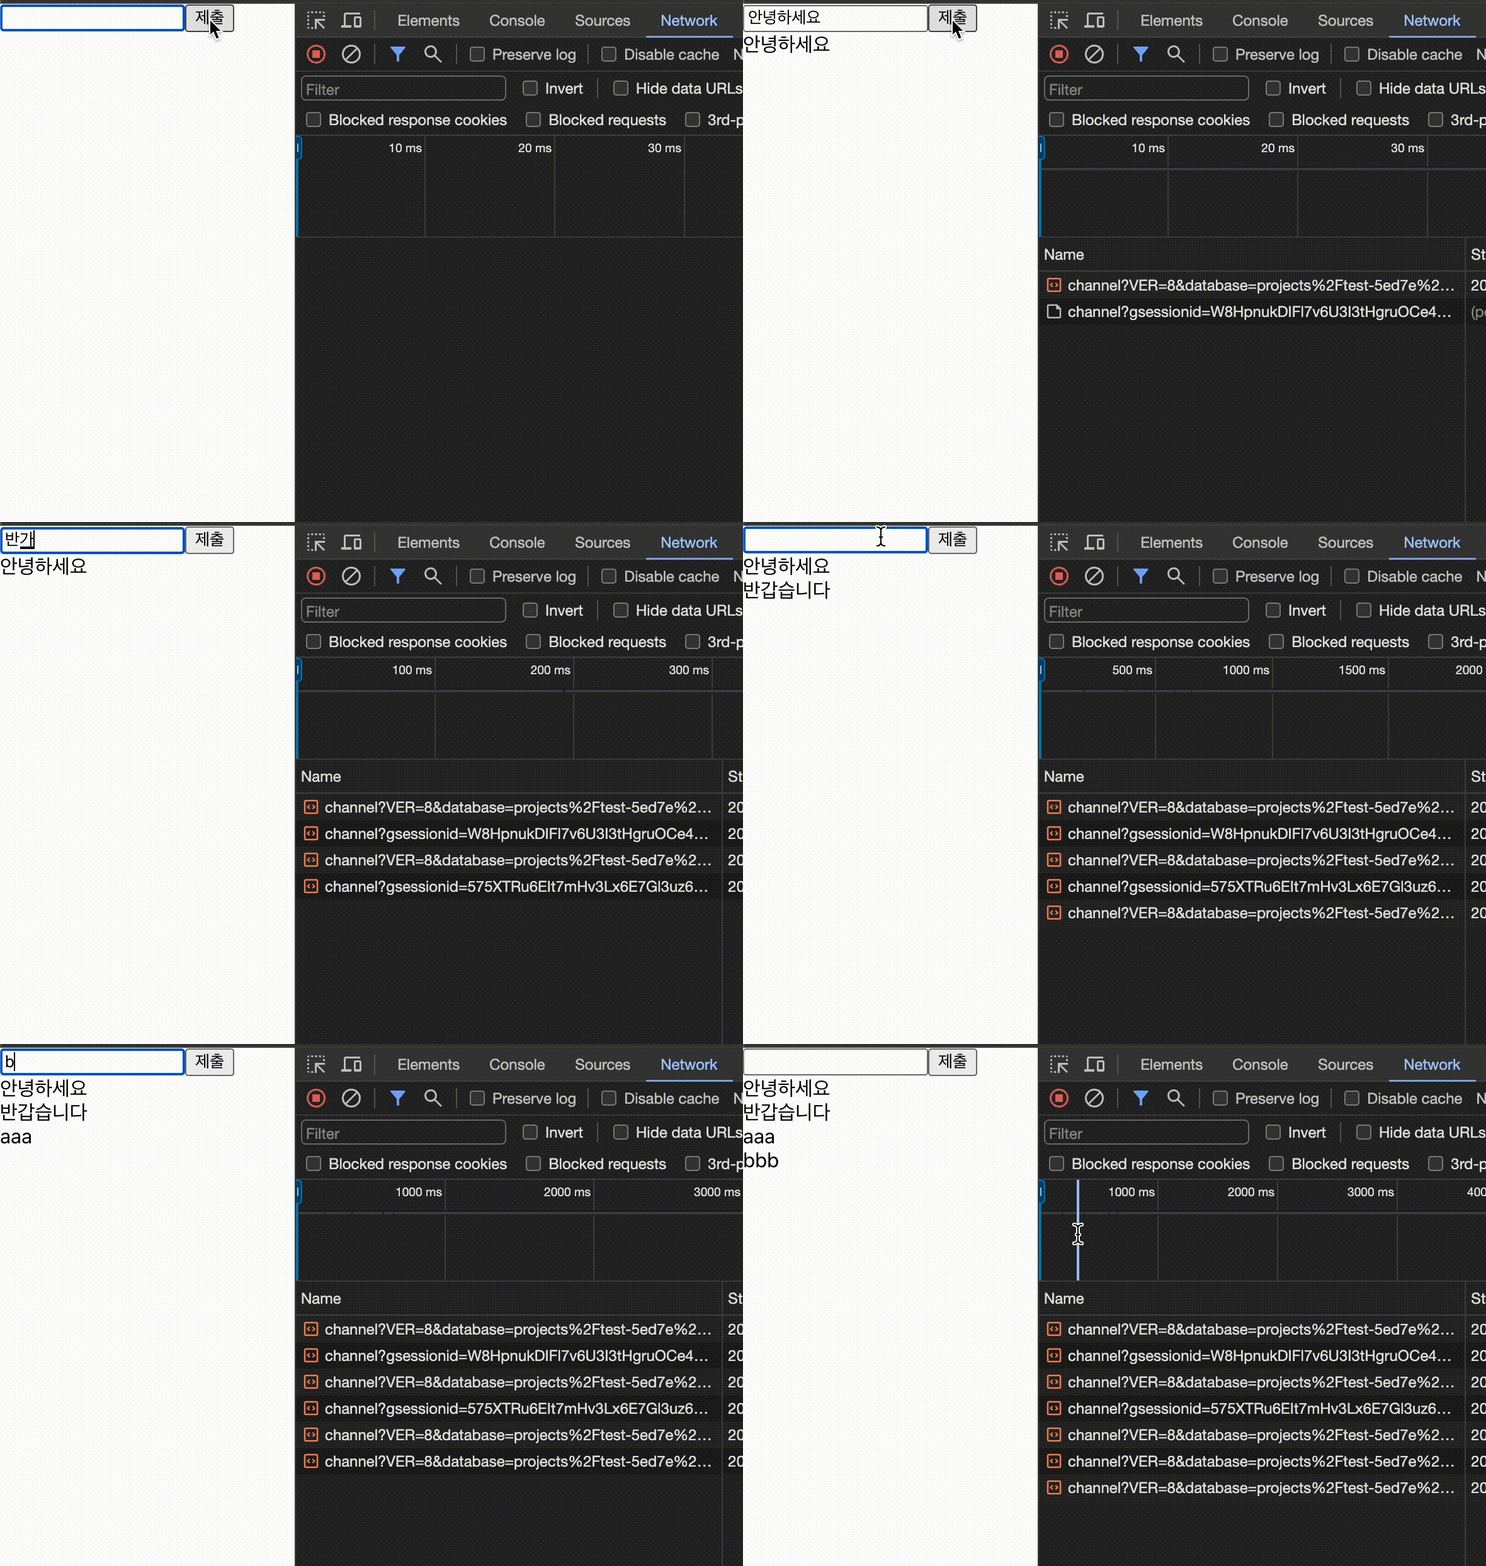
onSnapshot을 사용하면 실시간 리스너를 구현할 수 있습니다.
useEffect에 onSnapshot을 한 번만 넣어주면 리스너가 지속적으로 실행되어 데이터베이스가 업데이트 되면 자동으로 데이터가 업데이트됩니다.
import { useEffect, useState } from 'react';
import { db } from './firebase-config';
import { addDoc, collection, doc, onSnapshot } from 'firebase/firestore';

function App() {
  const [text, setText] = useState('');
  const [textList, setTextList] = useState([]);

  useEffect(() => {
    onSnapshot(collection(db, 'notice'), (snapshot) => {
      setTextList(
        snapshot.docs.map((doc) => {
          return doc.data().text;
        })
      );
    });
  }, []);

  return (
    <>
      <input value={text} onChange={(e) => setText(e.target.value)} />
      <button
        onClick={async () => {
          await addDoc(collection(db, 'notice'), {
            text: text,
          });
          setText('');
        }}
      >
        제출
      </button>
      {textList?.map((text) => (
        <div>{text}</div>
      ))}
    </>
  );
}

export default App;
실행 결과

12. 쿼리 커서로 페이지네이션 구현하기
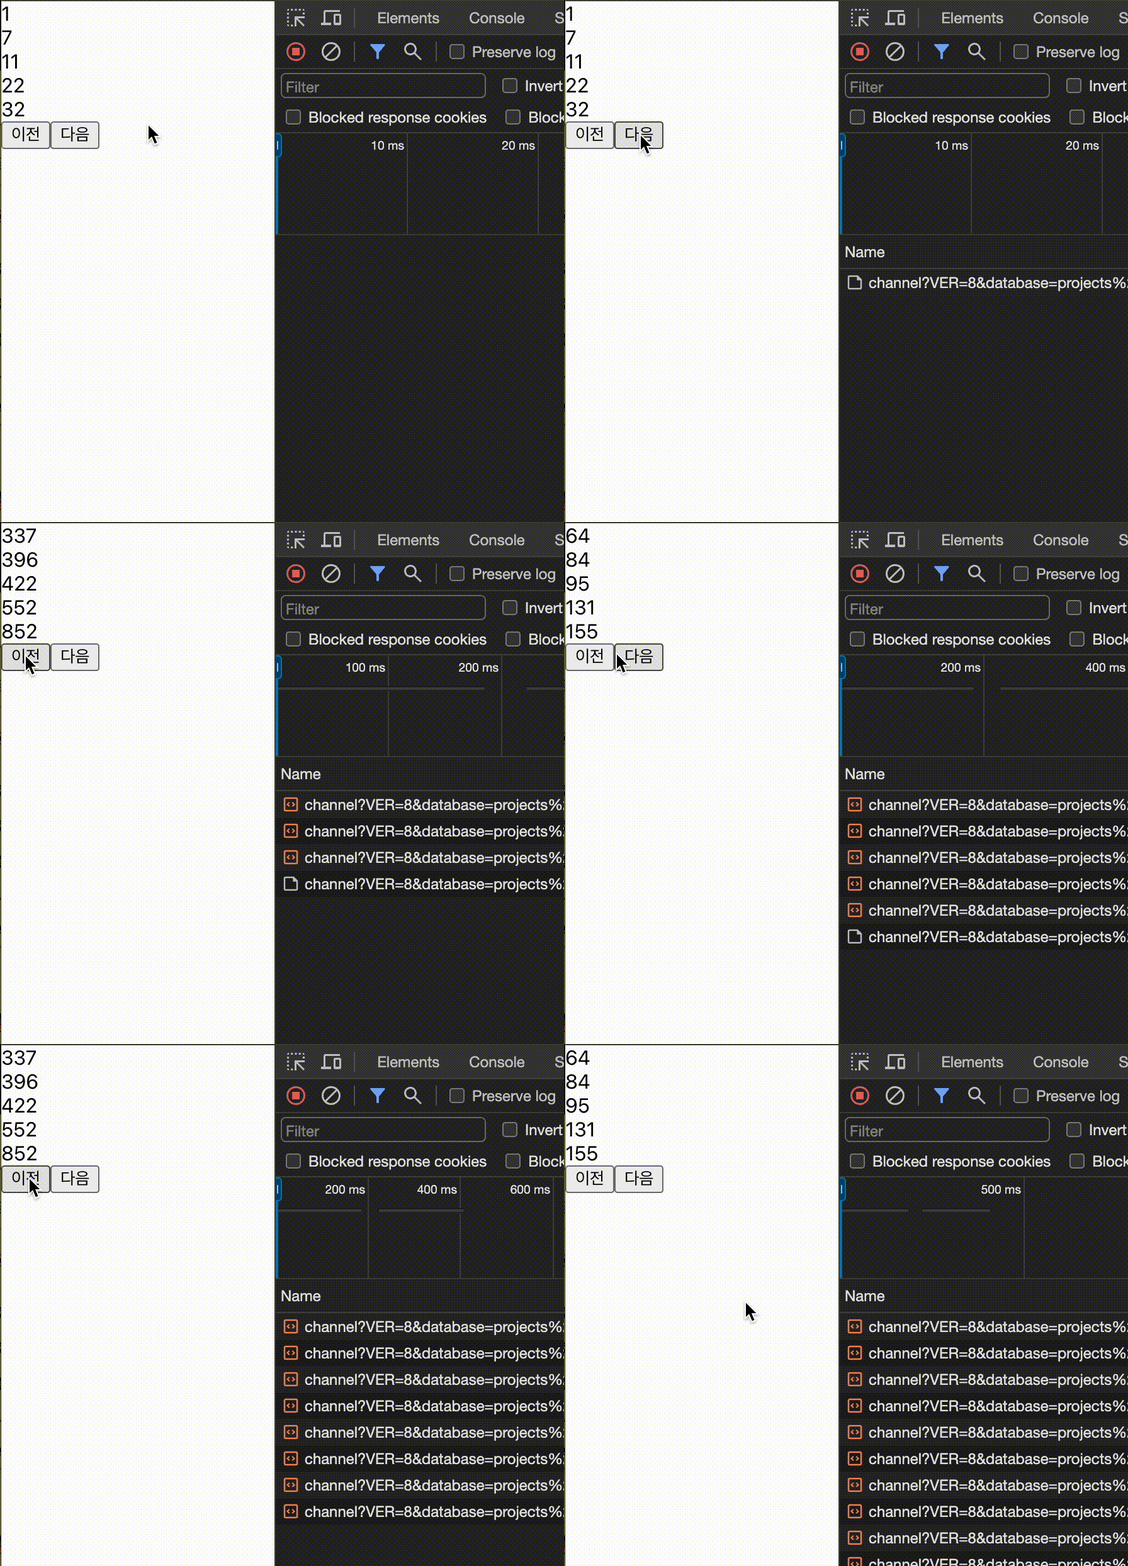
마지막 쿼리 커서 위치를 기반으로 이전 데이터, 다음 데이터의 조회가 가능합니다.
현재 커서 위치를 포함하여 다음 데이터를 가져올 경우, startAt을 사용하고, 포함하지 않을 경우 startAfter를 사용하면 되며, limit로 개수를 제한할 수 있습니다.
이전 페이지를 불러올 경우에는 endAt, endBefore을 사용하면 되며, limitToLast 매서드를 사용하여 개수를 제한할 수 있습니다.
아래 코드는 notice 컬렉션에서 text 필드 기준으로 오름차순으로 정렬한 후, 데이터를 5개씩 페이지네이션을 구현한 예시입니다.
import { useEffect, useState } from 'react';
import { db } from './firebase-config';
import {
  collection,
  endBefore,
  getDocs,
  limit,
  limitToLast,
  orderBy,
  query,
  startAfter,
} from 'firebase/firestore';

function App() {
  const [currentList, setCurrentList] = useState([]);
  const [currentSnapshot, setCurrentSnapshot] = useState('');

  const getFirst = async () => {
    const firstQuery = query(
      collection(db, 'notice'),
      orderBy('text'),
      limit(5)
    );
    const firstSnapshot = await getDocs(firstQuery);
    setCurrentList(
      firstSnapshot.docs.map((doc) => {
        return doc.data().text;
      })
    );
    setCurrentSnapshot(firstSnapshot);
  };

  const getPrev = async () => {
    const lastVisible = currentSnapshot.docs[0];
    const prevQuery = query(
      collection(db, 'notice'),
      orderBy('text'),
      endBefore(lastVisible),
      limitToLast(5)
    );
    const prevSnapshot = await getDocs(prevQuery);
    setCurrentList(
      prevSnapshot.docs.map((doc) => {
        return doc.data().text;
      })
    );
    setCurrentSnapshot(prevSnapshot);
  };

  const getNext = async () => {
    const lastVisible = currentSnapshot.docs[currentSnapshot.docs.length - 1];
    const nextQuery = query(
      collection(db, 'notice'),
      orderBy('text'),
      startAfter(lastVisible),
      limit(5)
    );
    const nextSnapshot = await getDocs(nextQuery);
    setCurrentList(
      nextSnapshot.docs.map((doc) => {
        return doc.data().text;
      })
    );
    setCurrentSnapshot(nextSnapshot);
  };

  useEffect(() => {
    getFirst();
  }, []);

  return (
    <>
      {currentList.map((doc) => (
        <div>{doc}</div>
      ))}
      <button onClick={getPrev}>이전</button>
      <button onClick={getNext}>다음</button>
    </>
  );
}

export default App;
실행 결과

아쉽게도 파이어베이스는 이전, 다음 방식의 페이지네이션 구현만 가능합니다.
특정 페이지로의 이동은, 모든 document를 받고서 프론트엔드에서 페이지네이션을 구현하지 않는 이상 현재로서는 불가능합니다.
참고자료
- https://firebase.google.com/docs/firestore?hl=ko
- https://firebase.google.com/docs/firestore/query-data/get-data?hl=ko
- https://firebase.google.com/docs/firestore/manage-data/add-data?hl=ko
- https://firebase.google.com/docs/firestore/manage-data/delete-data?hl=ko
- https://firebase.google.com/docs/firestore/query-data/listen?hl=ko
- https://firebase.google.com/docs/firestore/query-data/queries?hl=ko
- https://firebase.google.com/docs/firestore/query-data/order-limit-data?hl=ko
- https://firebase.google.com/docs/firestore/query-data/query-cursors?hl=ko
- https://velog.io/@khy226/Firestore-%EC%95%8C%EC%95%84%EB%B3%B4%EA%B8%B0
- https://fireship.io/lessons/firestore-pagination-guide/